Tuesday, 29 April 2025

Build a Simple To-Do App with Next.js


Step 1: Create the Project

Open your terminal and run:

npx create-next-app@latest nextjs-todo --app --ts
cd nextjs-todo
npm install

When prompted, choose:

  • App Router: Yes

  • Tailwind CSS: Yes

  • TypeScript: Yes


Step 2: Clean Starter Files

Open the project and delete the content of app/page.tsx.


Step 3: Add the To-Do App Code

Replace app/page.tsx with the following code:

'use client';

import { useEffect, useState } from 'react';

export default function Home() {
  const [tasks, setTasks] = useState<string[]>([]);
  const [input, setInput] = useState('');

  useEffect(() => {
    const saved = localStorage.getItem('tasks');
    if (saved) {
      setTasks(JSON.parse(saved));
    }
  }, []);

  useEffect(() => {
    localStorage.setItem('tasks', JSON.stringify(tasks));
  }, [tasks]);

  const addTask = () => {
    if (input.trim() === '') return;
    setTasks([...tasks, input.trim()]);
    setInput('');
  };

  const removeTask = (index: number) => {
    const newTasks = [...tasks];
    newTasks.splice(index, 1);
    setTasks(newTasks);
  };

  return (
    <main className="min-h-screen flex flex-col items-center justify-center bg-gray-100 p-4">
      <h1 className="text-3xl font-bold mb-6">To-Do List</h1>
      <div className="flex gap-2 mb-4">
        <input
          type="text"
          value={input}
          onChange={(e) => setInput(e.target.value)}
          placeholder="Add a new task..."
          className="px-4 py-2 rounded border border-gray-300 focus:outline-none focus:ring"
        />
        <button
          onClick={addTask}
          className="bg-blue-500 text-white px-4 py-2 rounded hover:bg-blue-600"
        >
          Add
        </button>
      </div>

      <ul className="w-full max-w-md space-y-2">
        {tasks.map((task, index) => (
          <li
            key={index}
            className="flex justify-between items-center bg-white px-4 py-2 rounded shadow"
          >
            <span>{task}</span>
            <button
              onClick={() => removeTask(index)}
              className="text-red-500 hover:text-red-700"
            >
              ✕
            </button>
          </li>
        ))}
      </ul>
    </main>
  );
}

Step 4: Confirm Tailwind CSS Setup

Your tailwind.config.ts should already include:

content: [
  './app/**/*.{js,ts,jsx,tsx}',
]

No further changes are needed if you selected Tailwind during setup.


Step 5: Run the App

Run the development server:

npm run dev

Then open your browser at:

http://localhost:3000

The app lets you:

  • Add new tasks

  • Delete tasks

  • Save tasks in local storage (they stay after refresh)

  • Use a clean and responsive UI with Tailwind CSS

Sunday, 13 April 2025

Angular Mini Blog App – Beginner Class Task


 Step 1: Create a New Angular App

bash

ng new blog-app cd blog-app

Choose CSS and say No to Angular routing when prompted.


 Step 2: Generate Components

bash

ng generate component blog-list ng generate component blog-form

Step 3: Create Blog Model

Create a file named blog.model.ts in the src/app folder:

ts

export interface Blog { id: number; title: string; content: string; author: string; date: string; }

Step 4: Create Blog Service

bash

ng generate service blog

Update blog.service.ts:

ts

import { Injectable } from '@angular/core'; import { Blog } from './blog.model'; @Injectable({ providedIn: 'root' }) export class BlogService { private blogs: Blog[] = [ { id: 1, title: 'Welcome to the Blog!', content: 'This is the first blog post.', author: 'Admin', date: new Date().toLocaleDateString() } ]; getBlogs(): Blog[] { return this.blogs; } addBlog(blog: Blog) { blog.id = this.blogs.length + 1; blog.date = new Date().toLocaleDateString(); this.blogs.push(blog); } }

📄 Step 5: Blog List Component

blog-list.component.ts:

ts

import { Component, OnInit } from '@angular/core'; import { Blog } from '../blog.model'; import { BlogService } from '../blog.service'; @Component({ selector: 'app-blog-list', templateUrl: './blog-list.component.html' }) export class BlogListComponent implements OnInit { blogs: Blog[] = []; constructor(private blogService: BlogService) {} ngOnInit(): void { this.blogs = this.blogService.getBlogs(); } }

blog-list.component.html:

html

<h2>Blog Posts</h2> <div *ngFor="let blog of blogs"> <h3>{{ blog.title }}</h3> <p>{{ blog.content }}</p> <small>By {{ blog.author }} on {{ blog.date }}</small> <hr> </div>

✍️ Step 6: Blog Form Component

blog-form.component.ts:

ts

import { Component } from '@angular/core'; import { BlogService } from '../blog.service'; import { Blog } from '../blog.model'; @Component({ selector: 'app-blog-form', templateUrl: './blog-form.component.html' }) export class BlogFormComponent { newBlog: Blog = { id: 0, title: '', content: '', author: '', date: '' }; constructor(private blogService: BlogService) {} addBlog() { this.blogService.addBlog({ ...this.newBlog }); this.newBlog = { id: 0, title: '', content: '', author: '', date: '' }; } }

blog-form.component.html:

html

<h2>Add New Blog Post</h2> <form (ngSubmit)="addBlog()"> <input [(ngModel)]="newBlog.title" name="title" placeholder="Title" required><br><br> <textarea [(ngModel)]="newBlog.content" name="content" placeholder="Content" required></textarea><br><br> <input [(ngModel)]="newBlog.author" name="author" placeholder="Author" required><br><br> <button type="submit">Add Blog</button> </form>

Step 7: Enable FormsModule

In app.module.ts, import FormsModule:

ts

import { FormsModule } from '@angular/forms';

Add it to the imports array:

ts

imports: [ BrowserModule, FormsModule ]

Step 8: Update app.component.html

html

<app-blog-form></app-blog-form> <hr> <app-blog-list></app-blog-list>

Run Your App

bash

ng serve

Open in your browser: http://localhost:4200

Sunday, 23 March 2025

Building a Simple JWT Authentication System with Express: A Beginner's Guide

In this tutorial, we'll walk through creating a JWT authentication system using Express.js. JWT (JSON Web Tokens) is a powerful tool for securely transmitting information between parties, and it's widely used in modern web applications for authentication.

What is JWT Authentication?


JWT (JSON Web Token) is an open standard for securely transmitting information between parties as a JSON object. It is commonly used in web applications to authenticate users and allow them to access protected resources.

In simple terms:

  1. JWT provides a way to authenticate users by generating a token after they log in.
  2. This token can then be used to access protected resources.
  3. The token is signed with a secret key, which ensures that the token has not been tampered with.

In this guide, we'll build a simple Express.js application that:

  • Allows users to log in and receive a JWT.
  • Protects certain routes using that JWT.

Let's dive in!


What Will We Build?

We'll create a simple Express.js server with the following features:

  1. Login route: A POST route where users submit their username and password to receive a JWT.
  2. Protected route: A GET route that requires a valid JWT to access.

Prerequisites

Before we begin, ensure you have the following:

  1. Node.js installed on your computer (download it here).
  2. A basic understanding of JavaScript and Express.js.

Step 1: Setting Up the Project

Let’s start by setting up a new Node.js project.

  1. Create a new directory for your project:

    Open your terminal/command prompt and create a new folder:

    mkdir jwt-auth-example
    cd jwt-auth-example
    
  2. Initialize the Node.js project:

    Run the following command to create a package.json file:

    npm init -y
    
  3. Install the necessary dependencies:

    We need three libraries:

    • express: The web framework for building our server.
    • jsonwebtoken: A library to create and verify JWTs.
    • dotenv: A library to manage environment variables securely.

    Install them using npm:

    npm install express jsonwebtoken dotenv
    

Step 2: Writing the Server Code

Now, let’s write the code for the Express server.

  1. Create a file named index.js in the root of your project.
  2. Add the following code to handle JWT authentication:
// Import necessary packages
const express = require('express');
const jwt = require('jsonwebtoken');
const dotenv = require('dotenv');

// Load environment variables from .env file
dotenv.config();

const app = express();
const port = 3000;

// Middleware to parse JSON request bodies
app.use(express.json());

// Secret key for signing JWTs (should be in .env file for security)
const SECRET_KEY = process.env.JWT_SECRET || 'your_jwt_secret_key';

// Dummy user data for demonstration (In a real app, you would query a database)
const users = [
  { id: 1, username: 'john_doe', password: 'password123' },
  { id: 2, username: 'jane_doe', password: 'securepassword' }
];

// Route for user login
app.post('/login', (req, res) => {
  const { username, password } = req.body;

  // Check if the user exists and if the password is correct
  const user = users.find(u => u.username === username && u.password === password);
  
  if (!user) {
    return res.status(401).json({ message: 'Invalid credentials' });
  }

  // Create a JWT token
  const token = jwt.sign(
    { id: user.id, username: user.username },
    SECRET_KEY,
    { expiresIn: '1h' } // Token will expire in 1 hour
  );

  res.json({ message: 'Login successful', token });
});

// Middleware to verify JWT token
const verifyToken = (req, res, next) => {
  const token = req.header('Authorization')?.replace('Bearer ', '');

  if (!token) {
    return res.status(403).json({ message: 'Access denied. No token provided.' });
  }

  jwt.verify(token, SECRET_KEY, (err, decoded) => {
    if (err) {
      return res.status(403).json({ message: 'Invalid token' });
    }
    req.user = decoded; // Attach user info to the request
    next(); // Proceed to the next middleware or route handler
  });
};

// Protected route that requires a valid JWT
app.get('/protected', verifyToken, (req, res) => {
  res.json({ message: `Welcome ${req.user.username}, you have access to this protected route!` });
});

// Start the server
app.listen(port, () => {
  console.log(`Server running on http://localhost:${port}`);
});

Step 3: Set Up Environment Variables

For security purposes, we don't want to expose our secret key directly in the code. Instead, we’ll store it in an environment variable using the dotenv package.

  1. Create a .env file in the root of your project.
  2. Add the following line to the .env file to store your secret key:
JWT_SECRET=your_jwt_secret_key

Replace your_jwt_secret_key with a strong, secret key. This key will be used to sign and verify JWT tokens.


Step 4: Testing the API

1. Login Endpoint (/login)

First, let’s test the login functionality. To log in, you need to send a POST request to the /login route with the following body:

{
  "username": "john_doe",
  "password": "password123"
}

If the credentials are correct, the response will contain a JWT token:

Response:

{
  "message": "Login successful",
  "token": "your_jwt_token_here"
}

2. Accessing the Protected Route (/protected)

Now that we have a token, we can access the protected route /protected. To do this, include the token in the Authorization header as a Bearer token.

Request:

GET http://localhost:3000/protected
Authorization: Bearer your_jwt_token_here

If the token is valid, the response will be:

{
  "message": "Welcome john_doe, you have access to this protected route!"
}

If the token is invalid or missing, you’ll get an error message like:

{
  "message": "Invalid token"
}

Step 5: Running the Server

To run the server, use the following command in your terminal:

node index.js

Your server will start running on http://localhost:3000

Saturday, 15 March 2025

MongoDB Integration with Express: A Step-by-Step Guide to CRUD Operations Using Mongoose

MongoDB is a powerful NoSQL database, and integrating it with an Express.js application is made easy with Mongoose. In this guide, we'll go through the step-by-step process of setting up MongoDB, installing Mongoose, defining a schema, and performing CRUD operations.


1. Install MongoDB Compass

MongoDB Compass is a graphical user interface (GUI) for managing MongoDB databases. You can download and install it from the official website:

🔗 Download MongoDB Compass

Once installed, you can use it to visualize and manage your database.


2. Install Mongoose

Mongoose is an Object Data Modeling (ODM) library for MongoDB, making it easier to interact with the database. To install it, run the following command in your project directory:

npm i mongoose


3. Define the Database and Collection in Mongoose

Now, create a new file named user.js in your project directory. This file will define the database connection and schema.

const mongoose = require("mongoose");

// Connect to MongoDB (Make sure MongoDB is running locally)
mongoose.connect("mongodb://127.0.0.1:27017/data1", {
    useNewUrlParser: true,
    useUnifiedTopology: true
});

// Define schema for the collection
const userSchema = mongoose.Schema({
    username: String,
    name: String,
    age: Number
});

// Export the model
module.exports = mongoose.model("student", userSchema);

4. Perform CRUD Operations in Express.js

Now, let's integrate MongoDB operations in the index.js file using Express.

a. Create a User (Insert Data)

This route creates a new user in the database.

const express = require('express');
const router = express.Router();
const userModel = require('./user'); // Import the user model

router.get('/', async function(req, res) {
    const user = await userModel.create({
        username: "Asma",
        age: 33,
        name: "Asma"
    });

    res.send(user);
});

b. Find a User (Retrieve Data)

This route fetches a user with a specific name.

router.get('/userone', async function(req, res) {
    let user = await userModel.findOne({ name: "mahine" });
    res.send(user);
});

c. Delete a User

This route deletes a user with a specific name.

router.get('/delete', async function(req, res) {
    let deletedUser = await userModel.findOneAndDelete({ name: "mahine" });
    res.send(deletedUser);
});

5. Checking the Database Updates

After adding, retrieving, or deleting users, you can check your MongoDB Compass to see the changes reflected in the data1 database under the students collection.


6. Running the Application

To run the application, first, install nodemon if you haven't already:

npm i -g nodemon

Now, start the server:

npx nodemon index.js

7. Testing the CRUD Operations

Open your browser or use Postman to test the following endpoints:

  1. Create a user:
    http://localhost:3000/
    
  2. Find a user:
    http://localhost:3000/userone
    
  3. Delete a user:
    http://localhost:3000/delete


Managing Sessions in Express.js with express-session

Managing user sessions is a fundamental aspect of web development, especially when dealing with authentication and user state management. In this guide, we'll explore how to use express-session in an Express.js application to store and retrieve session data.


1. What is express-session?

express-session is a middleware for Express.js that enables session management by storing session data on the server-side. This is useful for tracking user activities, authentication, and managing temporary data between requests.


2. Installing express-session

To get started, install the express-session package using npm:

bash

npm i express-session

3. Configuring express-session in Your App

First, require express-session in your main application file (e.g., app.js) and configure it as middleware:

javascript

const express = require('express'); const session = require('express-session'); const app = express(); // Configure session middleware app.use(session({ secret: "gggggghhhhhh", // Secret key for signing the session ID resave: false, // Prevents resaving session if nothing has changed saveUninitialized: false // Prevents saving uninitialized sessions })); app.use(express.json());

4. Setting and Retrieving Session Data in Routes

Now, let's create a route file (routes/sessionRoutes.js) to set and retrieve session values.

Setting Session Data

In the following route, we set session variables:

javascript

const express = require('express'); const router = express.Router(); router.get('/', (req, res) => { req.session.name = "hello"; req.session.ban = true; res.send("Session data set."); });

Retrieving Session Data

To access and check session data, we create another route:

javascript

router.get('/sessions', (req, res) => { console.log(req.session); // Logs session data to the console res.send(`Session Data: ${JSON.stringify(req.session)}`); }); module.exports = router;

5. Integrating Routes in the App

Now, include these session routes in your main application (app.js):

javascript

const sessionRoutes = require('./routes/sessionRoutes'); app.use('/session', sessionRoutes);

6. Running the Application

Run the application using:

bash

node app.js

Testing the Endpoints

  1. Set session data:
    Open your browser or use Postman and visit:

    bash

    http://localhost:3000/session/

    This will set session values.

  2. Retrieve session data:
    Visit:

    bash

    http://localhost:3000/session/sessions

    This will display the stored session data.

Friday, 16 August 2024

Theory of Automata Real-world Applications


Automata theory has several real-world applications in a variety of domains since it deals with abstract machines and the issues they might resolve. Automata theory is important in the following domains: 


Computer Science and Programming Languages:
Automata play a crucial role in compiler design, particularly in lexical analysis. Token recognition in source code is achieved by using finite automata to implement patterns defined by regular expressions.
Verifying Syntax Pushdown automata and context-free grammars aid in the parsing and comprehension of programming language structure, ensuring that code follows proper syntax.


NLP, or natural language processing,

Text Parsing: To analyze and comprehend human language, finite state machines and probabilistic automata are employed in a variety of natural language processing (NLP) applications, including named entity recognition and part-of-speech tagging.


Speech Recognition: To describe sound sequences, speech recognition systems frequently employ Hidden Markov Models (HMMs), a kind of probabilistic automaton.

Network Protocols:
Protocol Verification: The use of automata theory facilitates the modeling and verification of communication systems and network protocols to make sure they function as intended under various circumstances.


Finite state machines can be used to model and analyze network traffic patterns, which can aid in performance monitoring and security.


Systems of Control:

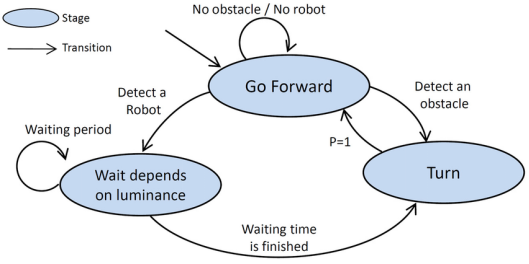
Automata are utilized in the design of control and embedded systems, including those seen in robotics and automation. Systems states and transitions can be modeled and controlled with the use of finite state machines.


Game Creation:

Behavior Modeling: Character and game element behavior is created and managed using automata models, such as finite state machines, to enable more dynamic and responsive interactions.


The field of bioinformatics

Sequence Analysis: In bioinformatics, automata are utilized for sequence alignment and analysis, including pattern recognition in protein structures or DNA sequences.


Design of Hardware:

Digital Circuit Design: To ensure that digital circuits and controllers function properly under a variety of circumstances, finite state machines are utilized in their design and implementation.


Robotics and Automation:

Path Planning: Finite state machines and other automata are used in robotics for path planning and obstacle avoidance. They help robots navigate complex environments by defining states for different stages of movement and decision-making.


Artificial Intelligence:

Behavior Trees: In AI, particularly in game AI, behavior trees use principles from automata theory to manage complex behaviors and decision-making processes in a structured way.


Data Compression:

Algorithm Design: Automata are used in algorithms for data compression. For example, the Lempel-Ziv-Welch (LZW) algorithm, which is used in file compression formats like GIF, relies on concepts from automata theory to efficiently encode data.


Text Search Algorithms:

Pattern Matching: Automata are fundamental to efficient text search algorithms. For instance, the Aho-Corasick algorithm uses a finite state machine to search for multiple patterns simultaneously in a text, making it highly efficient for applications like searching in large databases.


Cryptography:

Random Number Generation: Some cryptographic systems use automata to generate pseudorandom sequences of numbers. Linear feedback shift registers (LFSRs), which are a type of finite state machine, are commonly used in cryptographic applications for secure key generation and random number generation.


Tuesday, 6 August 2024

Understanding Self-Attention: The Core Mechanism Behind Transformers

Self-attention has become a key mechanism in artificial intelligence nowadays, driving some of the most sophisticated models in natural language processing (NLP) and other fields. Let's examine self-attention's foundations, advantages, and influence on machine learning to see why it is so revolutionary.


What is Self-Attention?

One of the main mechanisms in the Transformer architecture that enables a model to assess the relative relevance of various parts in a sequence is self-attention. Self-attention processes every element simultaneously, as opposed to standard models that process input sequentially. This improves efficiency and accurately reflects long-range dependencies.


 Self-attention is flexible enough to handle a wide range of data formats because it can concentrate on pertinent portions of the input by creating query, key, and value vectors from each token and calculating attention scores. This capacity has transformed domains such as computer vision and natural language processing, propelling progress in models like BERT and GPT.


How Does Attention to Oneself Operate?
In summary, each input token is used to create three vectors—a query vector, a key vector, and a value vector—that are then used by self-attention. Following that, these vectors are utilised to calculate attention scores, which establish the relative emphasis that each token in the sequence should acquire from the other tokens.

Query, Key, and Value Vectors: Using acquired linear transformations, every character in the input sequence is converted into one of these three vectors.

Attention Scores: To determine an attention score, take the dot product of a token's query vector and all of the tokens' key vectors. How much weight a token should provide to other tokens is indicated by this score.

Scaling: The scores are scaled by the square root of the dimension of the key vectors in order to keep the dot product from getting too big, which could compromise the stability of the gradients during training.

Softmax: To normalise the scaled scores into a probability distribution, they are run via a softmax function.

Weighted Sum: The final output representation for each token is obtained by adding the weights assigned to each value vector by these normalised scores.

Monday, 5 August 2024

Understanding the p-Value: A Key Concept in Statistical Hypothesis Testing

 The p-value is a vital notion in statistics that aids researchers in assessing the relevance of their findings. However, what is a p-value exactly, and why is it so significant?


A p-value: what is it?
In a statistical test, the p-value, also known as the probability value, is a metric that indicates how strong the evidence is against the null hypothesis. Generally speaking, the null hypothesis states that there is no impact or difference. In a clinical trial, for instance, the null hypothesis can claim that a novel medication has no effect when compared to a placebo.


How Does One Use the p-Value?
A p-value is computed during a hypothesis test to determine whether the null hypothesis should be rejected or not. This is a streamlined procedure:

  • Construct Hypotheses: Describe your alternative hypothesis (H₁) and null hypothesis (H₀).
  • Select the Level of Significance (α): The standard options are 0.05 and 0.01.
  • Determine the p-Value. Conduct the examination and determine the p-value.
  • P-Value in relation to α
  • Reject the null hypothesis if the p-value is less than or equal to α.
  • Do not reject the null hypothesis if the p-value is greater than α.  


How to Interpret the p-Value
  • A low p-value (≤ α) suggests that there is an inconsistency between the observed data and the null hypothesis. This shows that there is a statistically significant influence in your data.
  • Elevated p-value (more than α): Indicates that the observed data aligns with the null hypothesis. This indicates that the alternative hypothesis is not well supported by the available data.

Example: t-Test Calculation

Consider a simple example using Python's scipy library to perform a t-test:
from scipy import stats
import numpy as np

data1 = np.array([5, 6, 7, 5, 6])
data2 = np.array([8, 9, 10, 8, 9])
t_stat, p_value = stats.ttest_ind(data1, data2)
print("p-Value:", p_value)


Tuesday, 20 February 2024

: Unveiling the Magic Behind Mobile Camera Megapixels and Sensor Quality


Introduction:


In the fast-paced world of technology, smartphones have become an indispensable part of our daily lives. Among the myriad of features that make or break a smartphone, the camera holds a special place. Consumers often find themselves enticed by the promise of high megapixels and advanced sensors, believing these specifications directly correlate with superior image quality. In this blog, we'll delve into the intricacies of mobile camera megapixels and sensor quality to unravel the magic behind capturing stunning moments on your smartphone.


Understanding Megapixels:


Megapixels, often abbreviated as MP, have long been the marketing buzzword associated with camera quality. Simply put, a megapixel is equal to one million pixels, the tiny dots that make up a digital image. The more megapixels a camera boasts, the higher the resolution of the images it can capture.


However, it's crucial to understand that a higher megapixel count does not always guarantee better image quality. While it allows for larger image sizes and more extensive cropping without significant loss of detail, other factors such as sensor size, pixel size, and image processing play pivotal roles in determining the overall image quality.


Sensor Size and Pixel Quality:


Beyond megapixels, the size of the camera sensor plays a crucial role in determining the quality of photographs. The sensor is the component that captures light and converts it into a digital signal. Larger sensors can capture more light, resulting in better low-light performance and improved dynamic range.


Pixel size, another critical factor, refers to the individual light-sensitive elements on the sensor. Larger pixels can capture more light, which is particularly beneficial in low-light conditions. Smartphone manufacturers have begun to prioritize larger pixels over cramming more megapixels onto smaller sensors, leading to improved overall image quality.


Balancing Act: Megapixels vs. Image Processing:


Smartphone manufacturers face a constant challenge in striking the right balance between megapixels and image processing. While a higher megapixel count can be appealing, it is equally important to have advanced image processing algorithms to enhance color accuracy, reduce noise, and improve overall sharpness.


Optical Image Stabilization (OIS) and Electronic Image Stabilization (EIS) are examples of technologies that contribute to better image quality by compensating for shaky hands or movement during photography. Additionally, advancements in Artificial Intelligence (AI) have enabled features like computational photography, which enhances images through complex algorithms and machine learning.


Conclusion:


In the ever-evolving world of smartphone cameras, understanding the relationship between megapixels and sensor quality is essential for making informed purchasing decisions. While a higher megapixel count can provide advantages in certain scenarios, it is equally important to consider the size of the sensor, pixel quality, and advanced image processing capabilities.


As technology continues to progress, the focus is shifting towards a holistic approach to camera development, incorporating a synergy of hardware and software innovations. The magic behind capturing breathtaking moments on your mobile device lies not just in the numbers but in the intricate interplay of various components working seamlessly to deliver a superior photography experience.

Monday, 22 January 2024

"Launch Your Website in One Minute: A Quick Guide to Getting Started"

 You've made up your mind to jump into the world of the internet and make a website. The good news is that it only takes one minute to make a simple website with today's easy-to-use platforms and tools. That's right, one minute! As a simple way to help you start your online trip, let's break it down into steps.


Step 1: Pick a Platform


There are many tools for making websites, and each one is good for a different set of needs. Think about Wix, WordPress, or Squarespace as quick and easy ways to get started. These platforms are easy for beginners to use


because they have simple interfaces and themes that can be changed.


Second Step: Sign Up.


You need to make an account on the tool you want to use. Most of the time, this means giving your email address, making a password, and sometimes picking a payment plan (many platforms offer free plans with basic features to get you started).


The third step is to choose a template.


The site will probably ask you to pick a template after you sign up. The styles in templates are already made, but you can change them to fit your needs. If you're making a blog, portfolio, or business site, choose one that fits with what it's for.


Step 4: Make your content unique.


Now comes the fun part: making your website unique. You can easily add text, images, and other things to your pages with drag-and-drop features that come with most apps. You can change the design, colours, and fonts to fit your brand or style.


Step 5: Add Important Pages


Even though we want to keep things as quick as possible, don't forget to add important pages like Home, About, and Contact. These tell people what they need to know about you or your business and give them a way to get in touch.


Step 6: Look it over and publish it.


Just look at your website for a moment to see how it looks


on computers and phones. Press the "Publish" button when you're done. Thank you very much. Your page is now online.


Step 7: Domain (not required)


Most systems let you buy a custom domain, like www.YourName.com, if that's what you want. It could take more than a minute to do this step, but it will make you look more professional.


That's it! You've now made a simple website in just one minute. Even though this process gets you going quickly, keep in mind that you can always make your site better and add to it over time. Learn about what's possible online and have fun as you create and share your work with the world. Have fun making websites!


Thursday, 10 August 2023

The Code to a Healthy Lifestyle: Tips for Programmer Well-being

 Technology is constantly evolving, and programmers play a crucial role in shaping it. Their health can sometimes suffer as they spend hours coding, solving problems, and innovating. Maintaining good health is crucial for sustained creativity, productivity, and overall well-being. This blog explores the unique challenges programmers face and offers valuable insight into maintaining coder health.


A Programmer's Lifestyle


Programmers often find themselves immersed in a sedentary lifestyle, spending long hours seated in front of screens. This can lead to a host of health issues, including poor posture, weight gain, and increased risk of conditions such as cardiovascular disease and diabetes. Additionally, the mental demands of coding can contribute to stress, anxiety, and burnout.


Tips for Maintaining Programmer Health


Prioritize Physical Activity:


Incorporate regular exercise into your routine. Simple activities like stretching, walking, or yoga can counteract the effects of prolonged sitting.


Consider using ergonomic furniture and accessories to promote good posture while working.


Explore fitness trackers or apps that remind you to move and take breaks.


Mindful Nutrition:


Choose a balanced diet rich in fruits, vegetables, whole grains, lean proteins, and healthy fats.


Avoid excessive caffeine and processed foods, as they can contribute to energy crashes and decreased concentration.


Hydration:


Stay hydrated by drinking water throughout the day. Dehydration can lead to fatigue and decreased cognitive function.


Mental Health Matters:


Prioritize mental well-being by practicing relaxation techniques like meditation or deep breathing.


Set realistic goals to avoid burnout and maintain a healthy work-life balance.


Reach out for support when needed, whether from colleagues, friends, or mental health professionals.


Take Breaks:


Regular breaks can enhance productivity and prevent eye strain. Follow the 20-20-20 rule: every 20 minutes, look at something 20 feet away for at least 20 seconds.


Social Connections:


Engage in social interactions to counteract feelings of isolation. Attend tech meetups, conferences, or online communities to connect with fellow developers.


Continuous Learning:


Keep up with industry trends and new technologies, but avoid overwhelming yourself. Remember that learning is a journey, not a race.


Sleep Well:


Prioritize quality sleep. Create a comfortable sleep environment and establish a consistent sleep schedule.


Hobbies and Interests:


Pursue hobbies outside of coding to foster creativity and reduce stress. These activities can also provide a mental break and fresh perspectives.


Regular Health Check-ups:


Schedule routine health check-ups to catch any potential issues early and ensure you're in good physical health.

Saturday, 13 May 2023

Two PDA Example for Language (a^n b^n c^n d^n ) and (a^n b^n a^n b^n)


Here are two examples of pushdown automata (PDA) for the languages you mentioned:

  1. PDA for the language (a^n b^n c^n d^n):
  • Initial state: q0
  • Accepting state: qf

Transitions:

  • q0, ε, ε -> q1 ($, $)
  • q1, a, ε -> q1 (a, $)
  • q1, b, a -> q2 (ε, a)
  • q2, b, a -> q2 (ε, a)
  • q2, c, a -> q3 (ε, ε)
  • q3, c, a -> q3 (ε, ε)
  • q3, d, ε -> q4 (ε, ε)
  • q4, d, ε -> q4 (ε, ε)
  • q4, ε, $ -> qf (ε, ε)

In this PDA, we start by pushing a marker symbol ($) onto the stack. Then, for each 'a' input, we push 'a' onto the stack. When we encounter 'b', we start popping 'a' symbols from the stack. After processing all 'b' inputs, we transition to a state where we start popping 'c' symbols from the stack. Finally, we transition to a state where we pop 'd' symbols until the stack is empty. If we reach an accepting state with an empty stack, the PDA accepts the input string.

  1. PDA for the language (a^n b^n a^n b^n):
  • Initial state: q0
  • Accepting state: qf

Transitions:

  • q0, ε, ε -> q1 ($, $)
  • q1, a, ε -> q1 (a, $)
  • q1, b, ε -> q2 (b, a)
  • q2, b, a -> q2 (b, a)
  • q2, a, a -> q3 (ε, ε)
  • q3, a, a -> q3 (ε, ε)
  • q3, b, a -> q4 (ε, ε)
  • q4, b, a -> q4 (ε, ε)
  • q4, ε, $ -> qf (ε, ε)

This PDA works similarly to the previous one. We push a marker symbol ($) onto the stack and then push 'a' symbols for each 'a' input. When we encounter 'b', we push 'b' onto the stack. After processing all 'a' inputs, we start popping 'a' symbols from the stack for each 'b' input. If we reach an accepting state with an empty stack, the PDA accepts the input string.

These PDAs demonstrate the general idea of how you can design a PDA for these particular languages. Please note that these are simplified examples, and there can be multiple variations in the design of PDAs for these languages.